
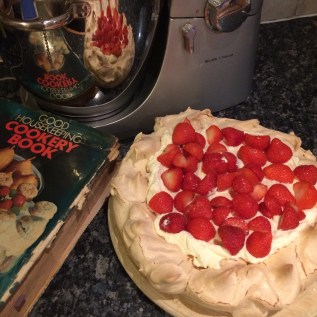
Pavlova conjures up so many memories of my childhood. We had pavlova for every family occasion – visitors, Communions, Christmas and Easters. It was always on the menu. Sometimes with kiwi or tinned fruit but they were never as popular as fresh strawberries.
Mary, my Mum was a keen baker and made a mean Pavlova. She passed away years ago and I was eager to keep her pavlova tradition going, at least on Christmas Day. I use the recipe she used. It’s from a battered and well used old edition of the Good Housekeeping Cookery Book. The sugar is in oz in the recipe below – I’ve added in the gr beside it. It’s an oz and very few pictures kinda book.
I’ve called this post Mary’s Strawberry Pavlova. If she was alive, she’d get such a kick out of people she’d never met using her tips and making ‘her’ pavlova ❤️
People are often daunted by making pavlova, but if you follow the recipe exactly and read our tips, below the recipe, you should have a perfect pavlova. Light and crisp on the outside with a soft and fluffy centre. Heaven to me.
Recipe:
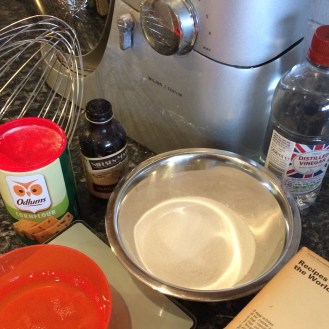
- 3 egg whites (I use large) * see tips below
- 6 oz caster sugar (170 g )
- 1/2 tsp vanilla essence
- 1/2 tsp vinegar *see tips below
- 1 level tsp cornflour
- 1/2 pint double cream, whipped (I use regular cream) * see tips below
- Fresh strawberries (at least one regular punnet, more if you like)
Method:
- Preheat the oven to 150 C
- Draw a 7″ circle on non stick baking paper and place paper on a baking tray
- Beat the egg whites until very stiff, then gradually add in the sugar
- Beat in the vanilla essence, vinegar and cornflour.
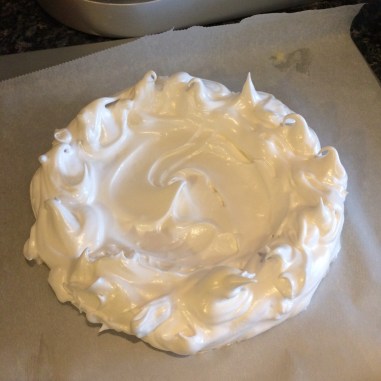
- Spread the meringue mixture over the circle and bake in the centre of the oven for about 1 hour.
- Leave to cool, then carefully remove the paper.
- Gently move pavlova onto a nice serving plate, pile with cream and arrange fruit on top.
Mary and cakemum tips and observations:
- I’ve been making pavlova for years and this recipe always has worked. I make my pavlova the evening before I need it. I leave it on a plate (undecorated), loosely covered with clingfilm until just before serving.
- Separating the eggs – it’s very important that no egg yolk gets into the whites. I separate one egg over two small bowls, then place the white in the large mixing bowl and move onto the next egg. Repeat process. If you keep all the egg whites together and get yolk in the bowl of whites, while separating, you’ll need to do all the eggs again. Yolk in pavlova pretty much means failure. I should probably recommend you use the yolks for something, but I always end up chucking them.
- Make sure that your large mixing bowl is sparkling clean. No grease or dust. I give the bowl an extra wipe with a clean tea-towel before starting.
- Vinegar – I normally use white vinegar but have used the brown one too, when stuck. Just regular vinegar that you put on your chips – doesn’t need to be fancy.
- When you whisk the egg whites and they become nice and stiff, add the sugar spoon by spoon while still mixing. You will see that the mixture gets a lovely shine. When the sugar is all mixed in, don’t keep beating it – you could over beat the mixture. Just go to the next step.
- The tradition is to be able to hold the bowl of meringue mixture upside down over your head (or someone else’s head!) and it won’t spill out. We’ve done this and it stays in the bowl.
- The recipe says to just spread the mixture over the circle on the non stick paper. In my family, we have always raised the sides by spooning more on the outside – so that there is a well in the centre for the cream and fruit. I always tend to make the base bigger than the 7” circle as it looks small and there is plenty of mixture.
- My mum used to do little swirls around the outside with a skewer in circular motion to get small peaks and give the effect it was kinda piped. I do it too but it’s just because she did it! The next picture might help explain what I mean.
- Some recipes say to leave the pavlova to cool in the oven, with the oven turned off. We never did that in our house. We always just take it out of the oven. Apparently there is less cracking if you leave it in the oven, as the meringue doesn’t get the shock of going to a colder air. Hmm. I never had major cracking – sure a little is fine. Personally, I would fear that the lovely marshmallowy centre would dry out if it was left in the oven longer – but sure each to their own.
- I only put the cream and fruit on shortly before serving (max a few hours). That way you are ensuring it stays crisp and you don’t need to store it in the fridge. Fridge space at family gatherings and Christmas can be precious.
- I do hope this post was helpful. You can whip up a pavlova in a few mins, it’s not technically difficult. Honest.
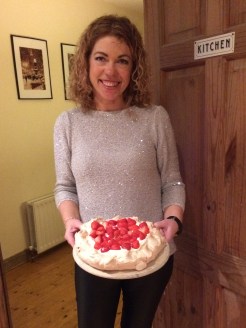
- I make pavlova every Christmas Day as a nod to my Mum. I even mentioned her in my blog name, she was my Mum (never Mam or Mammy). She is my baking inspiration. Hopefully we both with inspire you to try a pavlova one day x
- Pic below is on Christmas Day in 2018. I get a pavlova pic every year 😉 Sure we gotta be proud of our creations!
Happy Baking
De (aka thecakemum)
I’m on instagram
and on facebook
and would be delighted if you checked out my pages 🙂

Thanks for this, going to try over the weekend. My Mum always made a fantastic pavlova every Easter or if I pestered her enough a random Saturday lol. My fav bit is the almost chewy centre, I can’t be dealing with these ones that are just sugar dust.
LikeLike
I agree. Chewy centre is a must.
LikeLike